http://hypercircle.com/customization-of-contact-form-7-plugin.html
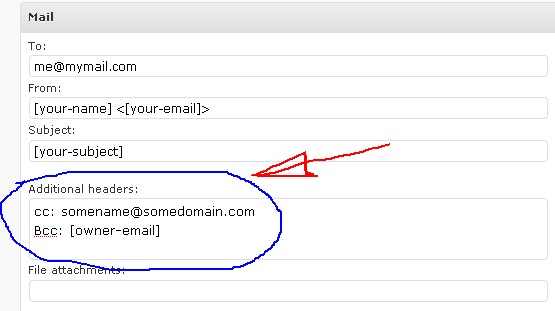
- Additional headers:You can input any header lines into the field and you can insert any tags into any place in each header line, just like other Mail fields. Viz: CC, BCC etc like this:
- After the form is submitted the viewer is able to see the response messages such as “Your message was sent successfully”, “Validation errors occurred.” etc. at the bottom of the form which is rendered through Ajax. This is the default behaviour. In some cases the location of the messages may fall below the first fold resulting in the viewer not being able to see the message unless he looks it up by scrolling the browser up. So you may like these messages to appear somewhere up so that it is not missed by the viewer.For shifting the message location, a tag [response] as the placeholder has been introduced. You can insert this [response] tag into any place of your choice in your form. You can use it multiple times in a form. If there is no [response] used, the response message is shown at the bottom of the form by default.
-
By default, the same page is shown after submission of the form. You can change this behaviour to take your viewer to a “Thank You” page for instance or any web page of your choice by inserting the following javascrpt code into the “Additional Settings” box (insert the URL of the page of your choice within the single quotes in parenthesis):
on_sent_ok: “location.replace(‘http://yourdomain.com/thank-you/’);”
-
The same action hook “on_sent_ok” can be used for multiple action after the form is submitted successfully. The following is the description offered by the plugin author in respect of this enablement:
Sometimes you might think of running custom codes after the form has been submitted. For example, you may wish to run Google Analytics’s tracking code for tracking their visitor’s usage of the contact form and counting it as conversions.The new JavaScript action hook would be useful in such a case. If you have a JavaScript code you wish to run after form submission is completed successfully, simply insert the code into the Additional Settings section (which is new in this version and is placed at the bottom of the admin panel) with preceding on_sent_ok keyword, like this:
Note that you need to quote the codes properly; and the code must be in one line.
To show you a more practical example, if you want to insert Google Analytics’s tracking function, enter it like this:
on_sent_ok: “pageTracker._trackPageview(‘/funnel_G1/step1.html’);”
-
By default, Contact Form 7 loads three JavaScript files — contact-form-7.js, jquery.form.js and jquery.js — into the header of each page. They are necessary for Ajax. If you want to disable such loading of these files in all pages and control it to load in select pages only, you can do that by first prevent their loading totally by inserting the following line in the wp-config.php file.
define (‘WPCF7_LOAD_JS’, false );Then you may call these files to load in a particular file by inserting the following line in the relevant template ahead of the call to wp_head():
wpcf7_enqueue_scripts();
You may agree that the page loading will be slower if too many files are loaded through calls to them in the header. Hence, the plugin author has coded it in such a way that these files are loaded only in the footer. Say “Thanks” to him for this!
-
Now you can specify the file upload limit size in bits, kb and mb units like this:
[file your-file limit:1048576]
[file your-file limit:1024kb]
[file your-file limit:1mb](Note that you can’t use a decimal point in it (i.e., like this: [file your-file limit:1.5mb]) and it will be ignored if it exists.)
